My friend Zaid texted me at like midnight saying his logo looked "too flat" and he needed the text to curve around a circle.
I asked him if he had Illustrator. He did. I told him to give me ten minutes and I'd walk him through it.
That ten-minute conversation turned into this article because honestly, a lot of people have this exact same problem and have no idea there are multiple ways to do it.
So let me just show you what I showed him.
First, Know What You're Actually Trying to Do
There are two totally different methods in Illustrator for curving text.
One puts text on a path, like around a circle or any shape. The other warps or bends the actual text block using effects.
Both are useful. Which one you need depends on what you're building.
I'm going to walk you through both so you're covered either way.
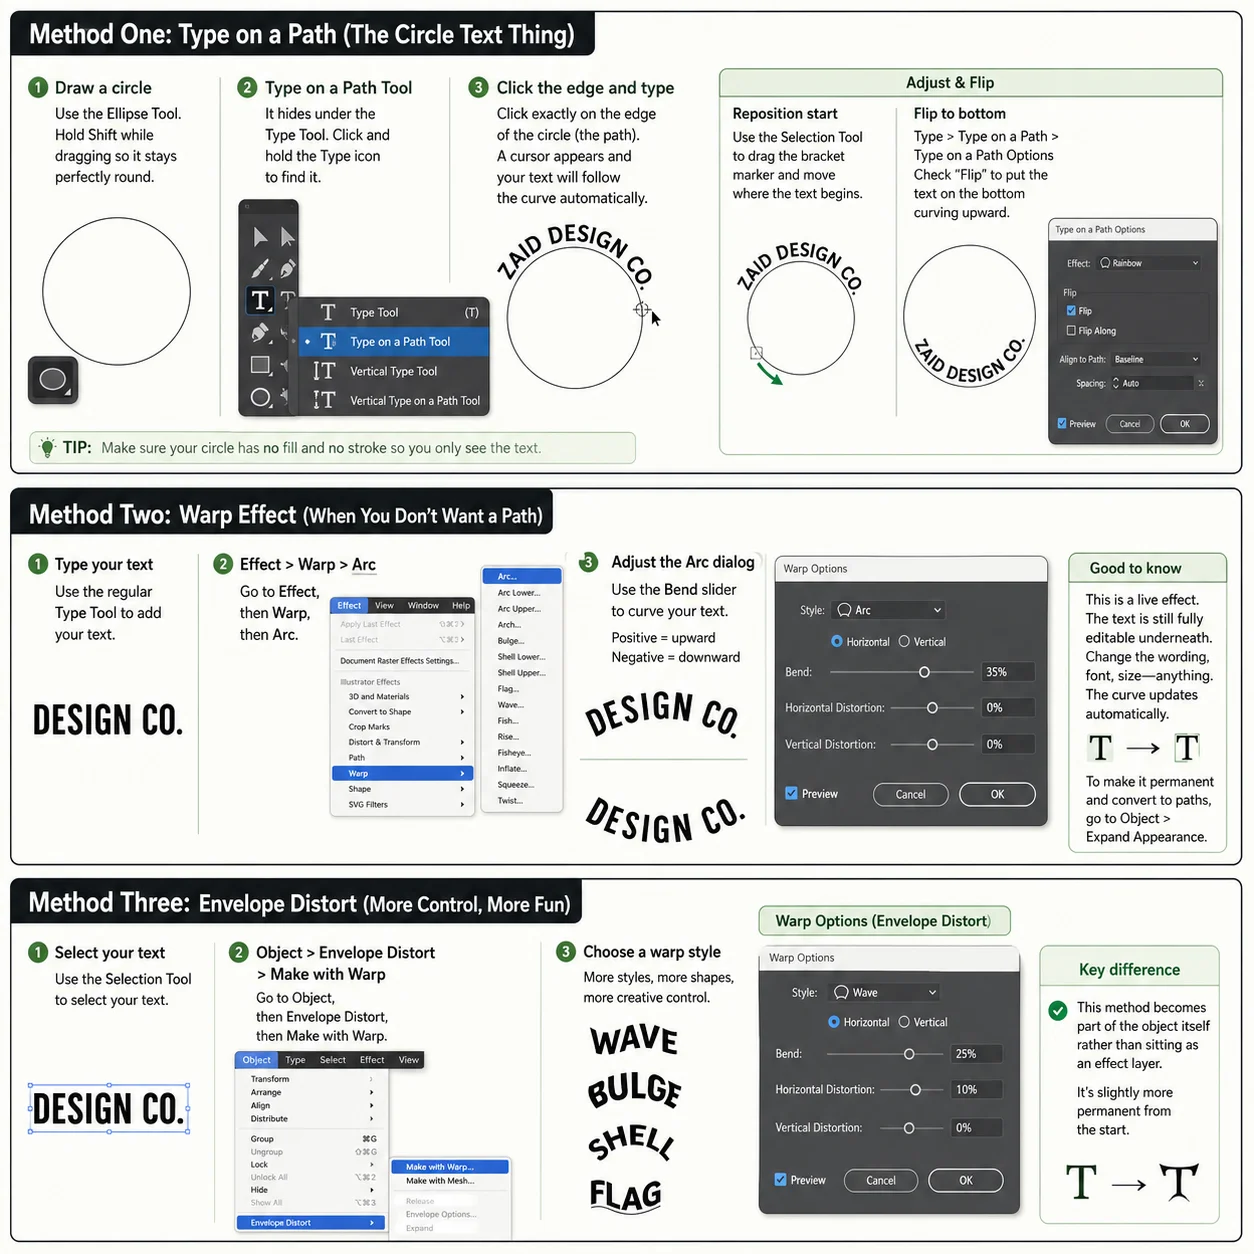 Method One: Type on a Path (The Circle Text Thing)
This is the one Zaid needed. Text that follows the edge of a shape.
Step one: Draw a circle using the Ellipse Tool. Hold Shift while dragging so it stays perfectly round.
You don't need to fill it or stroke it. Just get the shape on the canvas.
Step two: Grab the Type on a Path Tool. It hides under the regular Type Tool in the toolbar. Click and hold the Type icon and you'll see it in the dropdown.
Step three: Click exactly on the edge of the circle. Not inside, not outside. Right on the path.
A cursor appears and you start typing. The text follows the curve automatically.
That's it. We got Zaid's logo looking way better in like four clicks.
Now here's what trips people up:
The text might start at a weird position on the circle. To move it, switch to the Selection Tool and look for a small bracket marker on the path. Drag that to reposition where the text begins.
If you want the text on the bottom of the circle curving upward, select all, go to Type, then Type on a Path, then Type on a Path Options, and flip it.
I know that sounds like a lot of menu clicking but once you do it once, you'll never forget it.
Method Two: Warp Effect (When You Don't Want a Path)
Sometimes you don't want text following a shape. You just want it to have a curve to it, like an arc.
This method is faster and works on any text block.
Step one: Type your text normally with the regular Type Tool.
Step two: Go to Effect, then Warp, then Arc.
A dialog box opens up. There's a slider called Bend. Move it and watch the text curve in real time.
Positive values curve it upward. Negative values curve it downward.
We can also mess with the Horizontal and Vertical Distortion sliders to get more specific shapes but most of the time I just leave those at zero and only touch the Bend.
One thing to know
This is a live effect. The text is still fully editable underneath. You can come back and change the wording, the font, everything. The curve just sits on top as an effect.
If you want to make it permanent and convert the text to paths, go to Object, then Expand Appearance. But I'd only do that right before exporting.
Method Three: Envelope Distort (More Control, More Fun)
This one is for when you want something beyond a basic arc. Like a wave, a bulge, or a custom shape.
Step one: Select your text.
Step two: Go to Object, then Envelope Distort, then Make with Warp.
This opens the warp dialog again but now you get more options like Wave, Bulge, Shell, Flag. Each one gives a different type of curve.
The difference between this and the Effect menu version? This one becomes part of the object itself rather than sitting as an effect layer. Slightly more permanent from the start.
The other Envelope Distort option
Make with Mesh. This drops a mesh grid over your text and you can drag individual anchor points to curve or twist specific parts of the text.
This is the one you use when you want a really custom bend that no preset can give you.
It takes a minute to get the hang of but honestly once you do, you can do some wild things with typography.
The Part Nobody Talks About: Editing Curved Text Later
Here's where beginners mess up. They curve the text, it looks great, then they need to fix a typo.
If you used Type on a Path, just switch to the regular Type Tool and click the text. You can edit it like normal.
If you used a Warp Effect, same deal. Click into the text and edit. The warp updates automatically.
If you used Envelope Distort with a mesh, you need to go to Object, Envelope Distort, Edit Contents to get back into the text. Then exit out and the mesh comes back.
I think this is why people sometimes hate working with curved text. They don't know how to get back in to edit it.
Now you do.
Quick Tips I Actually Use
A few things I've picked up from doing this a bunch of times.
Lock the baseline shift. When text sits on a circle, sometimes individual letters look uneven. Select all the text, open the Character panel, and set Baseline Shift to zero. That usually fixes it.
Adjust tracking for paths. Text on a curved path sometimes looks too cramped or too spaced out. The Character panel's tracking control handles that. I usually bump it up slightly when text goes around a tight circle.
No stroke on your path shape. If you drew a circle to type on, make sure the fill and stroke are both set to none. Otherwise you'll see the circle sitting under your text and it looks weird.
Outline before export. If you're sending this file to a printer or sharing it with someone who might not have the font, go to Type, Create Outlines. This locks everything in. Just make sure you're done editing first.
And if you want to keep experimenting with creative tools and AI-assisted design workflows, I wrote about some of that over at SoftwareXP. Worth checking if you're into this stuff.
When Things Go Wrong
Text is on the inside of the circle: That means you clicked the inside of the shape instead of the path edge. Undo and try again, clicking right on the border.
Text disappeared after clicking: You probably created a new text frame accidentally. Hit Ctrl Z, zoom in, and try clicking directly on the path line.
Warp is grayed out: This happens when the text is inside a group or has certain effects already applied. Try ungrouping first or applying the warp to a fresh text box.
Arc looks off in one direction: Mess with the Horizontal Distortion slider in the warp options. That controls whether the curve leans left or right.
Most curve text problems in Illustrator come down to clicking in the wrong spot or having something selected that shouldn't be.
Zoom in more than you think you need to. That alone fixes a lot.
FAQs
Can I curve text in Illustrator without drawing a shape first?
Yes. Use Effect, then Warp, then Arc. No shape needed. Works directly on the text.
How do I make text curve around a circle perfectly?
Draw a circle with the Ellipse Tool, then use the Type on a Path Tool to click the circle's edge and start typing.
Can I still edit text after curving it?
Yes, unless you've expanded or outlined it. Just click back into the text with the Type Tool.
How do I flip text to the bottom of a circle?
Go to Type, Type on a Path, Type on a Path Options, and check the Flip checkbox.
Does curving text work with any font?
It works with all fonts. Decorative or script fonts especially look great on curved paths.
What's the difference between Warp Arc and Type on a Path?
Type on a Path locks text to a shape's edge. Warp Arc just bends the text block visually without attaching it to anything.
Can I remove the curve later?
Yes. For Warp Effects, go to Appearance panel and delete the effect. For Type on a Path, you'd need to retype the text normally.
Is there a keyboard shortcut for Type on a Path?
No built-in shortcut, but you can assign one in Edit, Keyboard Shortcuts if you use it often.
Curving text in Illustrator honestly is not that deep once you know which method to use for what.
Type on a Path for circle logos and badge designs. Warp Arc for quick bends. Envelope Distort when you want something more custom.
I walked Zaid through this in about fifteen minutes and his logo ended up looking clean. Same can work for you.
If you're still stuck, drop a comment or reach out. I actually check these things.